Registration Steps
- Open the Register Dialogue by clicking
 icon from menu bar.
 - Go to Facade Tab
- Enter the Grid Spacing and select the Highlight Colour (Selected
objects are highlighted using this colour) as per your requirement. - Type name for facade in the Facade Name field. Alternatively, you can enable the auto name option from settings which will add the facade name automatically.
- Auto Naming option can be enabled/disabled from Register section in Application Settings. Similary, you can also set your own custom prefix to be used for facade name.
- Facade mapping can be done for
- Solid faces
- Select the objects.
- Select button can be used multiple times to add objects in different parts of the model. Text message next to select and register bottom shows the total objects which are selected which should also be highlighted using the Highlight Facade colour. Button next to text messsage can be used to clear selected facade before registration.
- Click on Register.
- It is also possible to create a group with objects supported for Facade registration (group name must start with FG_ ). The group then appears in the Selection Type list.

Modify Steps
- Open the Modify Dialogue by clicking
 icon from menu bar .
 - Go to Facade Tab.
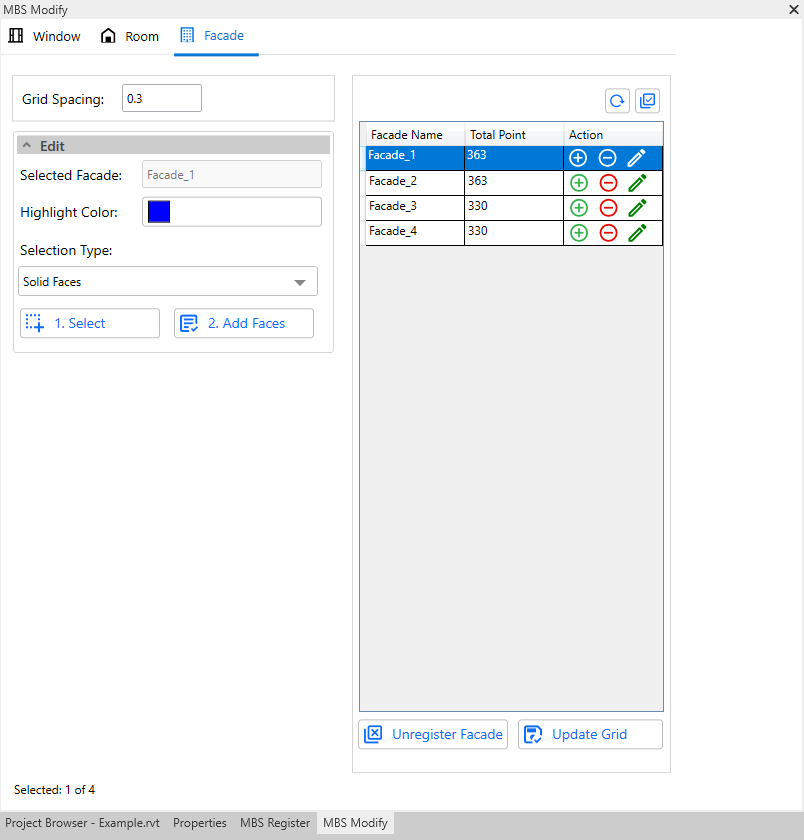
From modify dialog, you can add / remove faces, rename facade, update grid spacing and unregister the selected facades.
Note: If the recently registered facade is not shown in the table, click on the Reload button above the table, which will repopulate the table.
Add Face
- Click on the + icon in the table. This will show a new section called edit below the Grid Spacing section.
- Choose the type of object you want to select from the model in the Selection Type option.
- Click 1. Select.
- Select the relevant face you want to add. After selection, the selected count gets displayed as a text message below the buttons.
- Next, click on 2. Add Faces. This will append the selected faces with existing faces.
Remove Face
- Click on the – icon in the table. This will show a new section called edit below the Grid Spacing section.
- Choose the type of object you want to select from the model in the Selection Type option.
- Click 1. Select.
- Select the relevant face you want to remove. After selection, the selected count gets displayed as a text message below the buttons.
- Next, click on 2. Remove Faces. This will detach the selected faces from the facade.
Rename Facade
- Click on icon. This will show a new section called Rename.
- Enter the desired name you want to give for the selected facade in Facade Name field.
- Click on Rename button. This will update the name of selected facade in table.
Upgrade Grid Spacing
- Select the Facades from the table. (You can select multiple facades at once.)
- Enter the desired Grid Spacing in the Grid Spacing field.
- Click the Update Grid button. The Total Point column gets updated once the grid point update is complete.
Unregister Facade
- Select facades in the the table. (You can select multiple facades at once.)
- Click on Unregister Facade button.
Calculation Steps
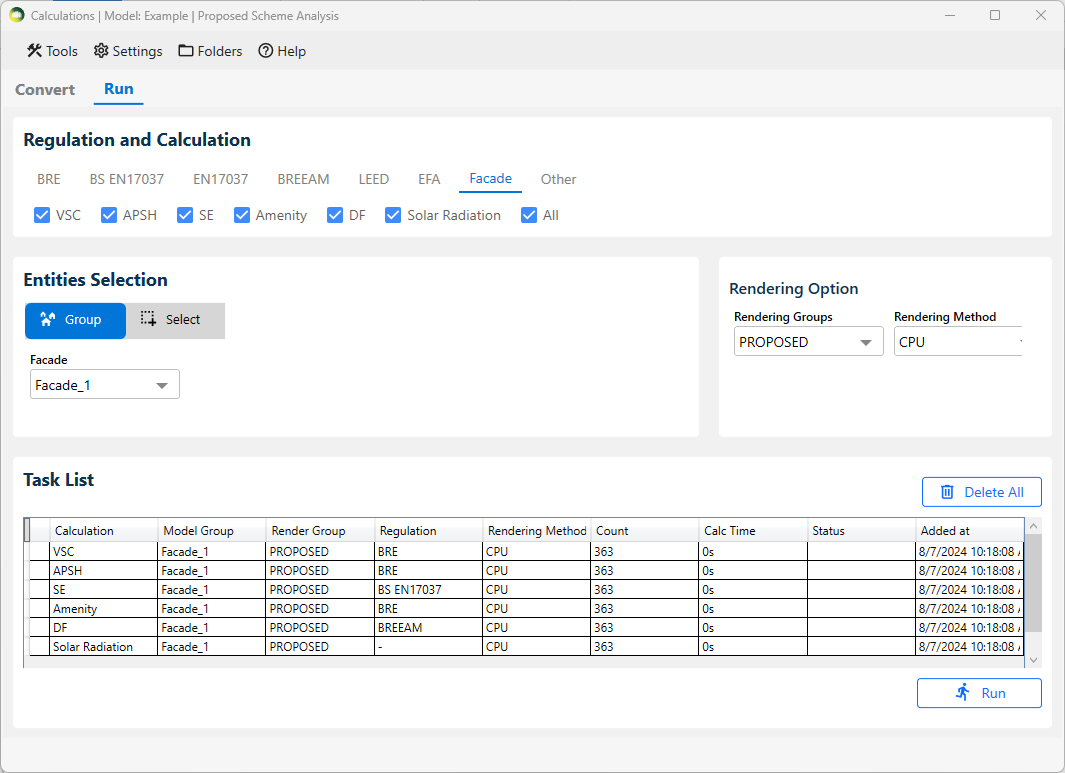
- Open the Calculation dialogue and convert the model groups by clicking the Convert button at the bottom right in the Convert tab.
- Go to the Run tab.
- Under the Regulation and Calculation section, click on the Facade Tab. All the supported calculations for Facades are listed under this tab.
- Select the calculation type by clicking on the tick box and change the Facade Name from the dropdown box displayed in the Entities Selection section if required.
- All option from the Facade dropdown can be used to add all the registered facades in one go for selected calculation.
- Before running, make sure the settings are right.
- Open Legends dialogue, you can select either Gradient or Bands.
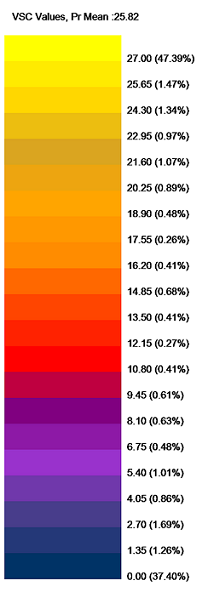
- To get results on legend select “Display % of area for results” option. See Legend Settings Section for more details.
- After changing the Settings, click on OK.
- Open Application Settings > Calculations tab, enter Sky sub division angle for VSC calculation (5 degree is suggested).
- Click the Run button at the bottom right in the calculations dialogue to run the calculation.
Result Steps
- The facade results can be displayed as Revit Analysis Result or as image on a solid face.
- The option is Application Settings > Calculation tab (Create Room/Facade Results persistent over Revit sessions. Untick to use Revit Analysis Result)
- Each calculation has its own layer (ex: FACADE_1_VSC_PROPOSED_FACADE).
- If you select “both” groups you also get the loss (ratio of proposed and existing) in its own layer (ex: FACADE_1_VSC_LOSS_FACADE).
- Use Realistic visual style as facade result colors are not visible in Wireframe view.
- The facade legend can be found in [Model_Name]_Waldram\images\FacadeLegend folder. The image on the right is created for VSC Proposed using a Gradient mode.
- CSV report are automatically created in [Model_Name]_Waldram\Reports folder.
Clear Facade Result
- Open Calculation dialogue.
- Click on Tools in menu bar.
- Click on Clear results > Facade Results.
How can I get the facade results back when I reopen the model?
- This is only necessary if Revit Analysis Result is used
- The facade results are stored as Analysis results in Revit and are not saved after the Revit session closes.
- They can be recreated by reloading the results.
Load Facade Result
- Open Calculation dialogue.
- Click on Tools in menu bar.
- Click on Load results
- Browse for the Facade result (.out file)
- Press Load