Installation
What are the steps for installation?
- Right-Click the MBSDaylightForSketchupSetup.exe file and Select Run as administrator.
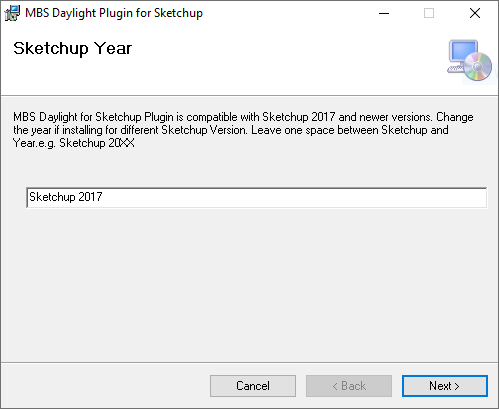
- Change the Sketchup Year on the textbox as required. Leave exactly one Space between Sketchup and the Year and don’t leave any extra spaces after the year.
- Follow rest of the steps and leave default values for any options.
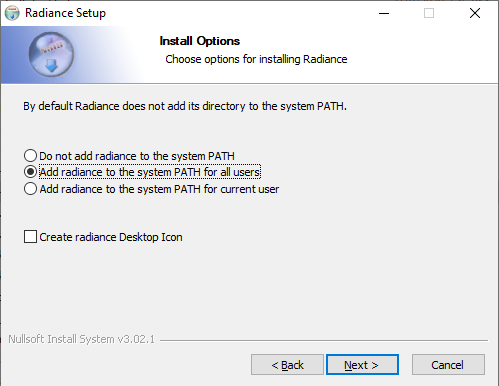
- Remember to Select Add radiance to the system PATH for all users.
What are the steps for updating the software?
- For future updates, follow the below steps
- Open the Software Update dialog by using
the Update plugin icon on the toolbar or
Sketchup Menu > Extentions > MBS Daylight Tool > Update Plugin - Sketchup must be restarted after the update.
- The list of the latest changes will be listed on the dialog.
- Open the Software Update dialog by using

What Sketchup versions is the plugin compatible with?
- The plugin is compatible with Sketchup version 2017 or newer and works on Windows 7 or newer PCs.
Why does the MBS toolbar not appear after installation?
- In some cases, it may remain disabled after installation. Go to View-Toolbars menu and Tick MBS Daylight Toolbar to enable it.
- The commands can also be accessed Extensions – MBS Daylight Tool menu.
- If both options are not visible, Check if the mbsTool extension is disabled on Extension Manager.
Licensing
How to activate the Trial License?
- The Trial license is automatically activated when any of the analysis is run for the first time.
- Groups and registration can be done before the Trial activation.
- The license will be valid for 7 days from the time of activation and gives access to Full features of the Plugin.
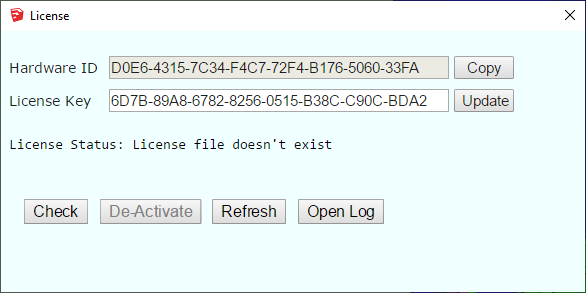
- To manually activate the Trial license or to Check the status
- Click on the Key icon on the MBS toolbar.
- Go to Extensions Menu then MBS Daylight tool then Manage License
- Click Check to activate or check the status.
How to upgrade to the Subscription License?
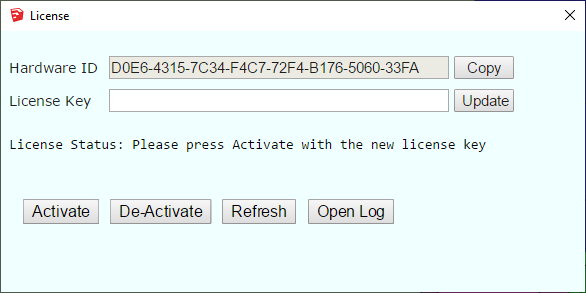
- Once you purchase a Subscription license from MBS, Contact us with the Hardware ID.
- We will provide you with a Subscription version License key.
- Paste the new key to the License Key textbox and Press Update.
- Press Activate. (Internet connection is required).
- The software validates the license regularly with our license server to allow the license to be used on multiple computers.
- Sometimes firewall or anti-virus restrictions can block the license activation and validation. Contact us for details about the license server address which the IT team might need in order to allow the activation.
* The plugin can be installed and used on multiple computers. There is a 30 min cooling off period once the plugin is used on one computer before it can be used on another computer.
How to transfer license to another computer?
- The plugin can be installed and used on multiple computers.
- There is a 30 min cooling off period once the plugin is used on one computer before it can be used on another computer.
- If the plugin needs to be used before the cooling off period, the license needs to be de-activated from the computer where it was last used.
- Once it is de-activated, it can be used on another computer.
Groups
How to name the groups?
- Groups must be named precisely. Existing, Proposed, Surrounding.
- Existing : For buildings/structures which are demolished.
- Proposed : For buildings/structures which are added.
- Surrounding: For buildings/structures which stay the same.
How to group the objects?
- Proposed Scheme doesn’t need Existing group to be present. Analysis type must be changed to Proposed Scheme in Project tab in Settings dialog.
- Extensions to a building.
- If nothing is being demolished and only new extension is being added, then the Existing group can be created with a dummy face on the ground to allow neighbour analysis.
- The Existing, Proposed, Surrounding groups must be the group on top level and not be nested inside any other groups.
How to apply same material on Front and Back face?
It is important to make sure that both front and back face has same material before running calulation in GPU. To apply same material on both face, please follow following steps:
- Open Convert dialog.
- Click on Apply Same material to Front & Back
Registration
Window
How to register individual Window Faces?
- Open Register Dialog.
- Make sure that you are on Window tab (By default you will be on window tab after you opening the register dialog).
- Then switch to Register mode. (Register button gets highlighted with white background)
- Select an appropriate Building, Floor name and all other parameters in their respective input field. Note: Building name, floor name and transmittance can be added, edited and deleted by clicking on
 icon next to them.
 - Next, click on Pick Face to Register button.
- Hover the mouse over the face which needs to be registered. Click on the face when its highlighted.
- Window number will be automatically incremented by 1. Building, floor name or window number can changed if necessary before registering another face.
- The Traffic Light indicator are added on to indicator layer(tag). If they are not visible, make sure the layer is on.
- Press Esc to end the register process.

How to register multiple Window faces from Layers?
- Open Register Dialog.
- Make sure that you are on Window tab
- Then switch to Register mode.
- Select Building from the lists. These names can be edited by clicking on icons next to them.
- Floor name is detected automatically based on elevation of the centre of the window face.
- Lowest floor is assumed to be on 0 elevation. This can be adjusted on Lowest Floor Elevation text box.
- Default ceiling height is 2.5 m. This is used to decide which floors the faces belong to and can be changed if necessary.
- There must be enough entries for floor names on the list. Otherwise higher windows will be placed on last floor.
- Select one or more layer (tag) names from the list.
- Press the Register Windows By Layer button.
- Window number for faces will be automatically incremented by 1 from the given number.
- The Traffic Light indicator are added on to indicator layer(tag). If they are not visible, make sure the layer is on.
- The Traffic Light indicator is added to the front of the face, so the faces must be oriented correctly. If they are facing inside Flip Traffic Lights can be used to change orientation.
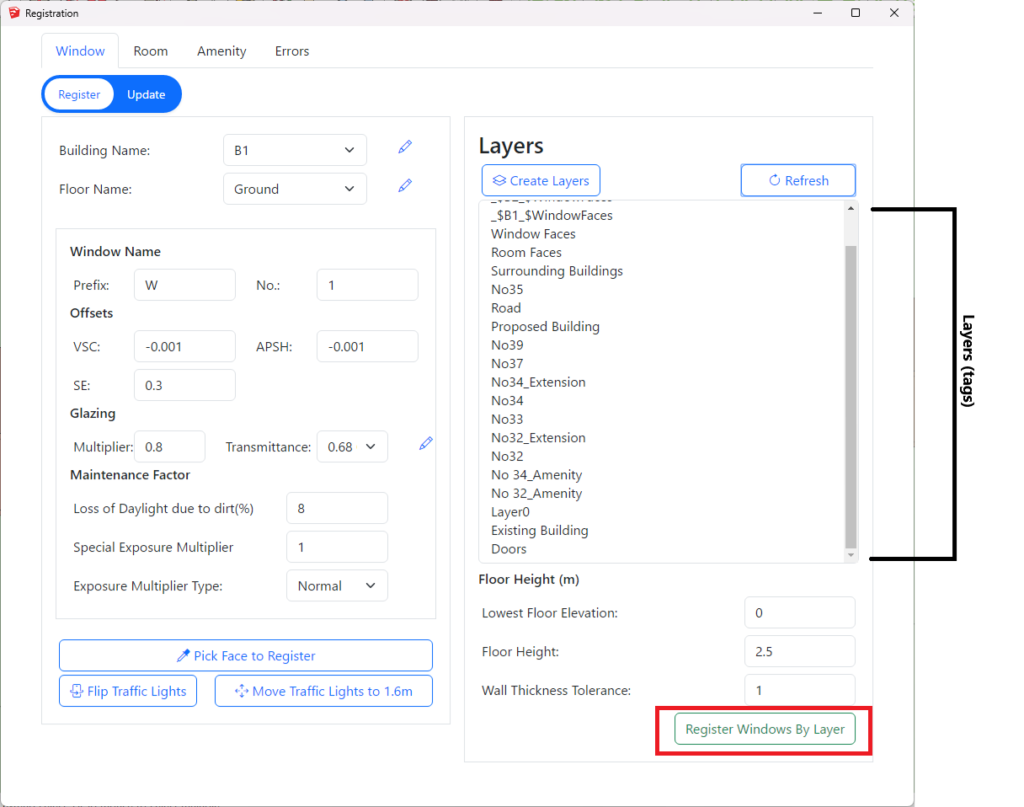
How to specify name of the building on the layer name for layer registration for Window?
Layer name should start with _$ followed by name of the building followed by _$
- For example, Window faces for the building B1 should be in a layer named _$B1_$WindowFaces.
- Open Registration dialog – Window Tab – Register Option has Create Layers button which creates the required layers for window faces for all the building names in the list.
- e.g. _$B1_$WindowFaces, _$B2_$WindowFaces
Room
How to register individual Room faces?
- Open Register Dialog then Click on Room tab and Click on the Register option.
- Select Building, Floor name and fill in other other room properties from their respective input fields. The building name, floor name, room type and property type can be managed by clicking on icon next to them.
- Click the Pick Face to Register button.
- Hover the mouse over the face which needs to be registered. Click on the face when its highlighted.
- Room number will be automatically incremented by 1. Building, floor name or room number can changed if necessary before registering another face.
- The room label are added to Room_Names layer(tag). If they are not visible, turn on the layer.
- Press Esc to end the register process.
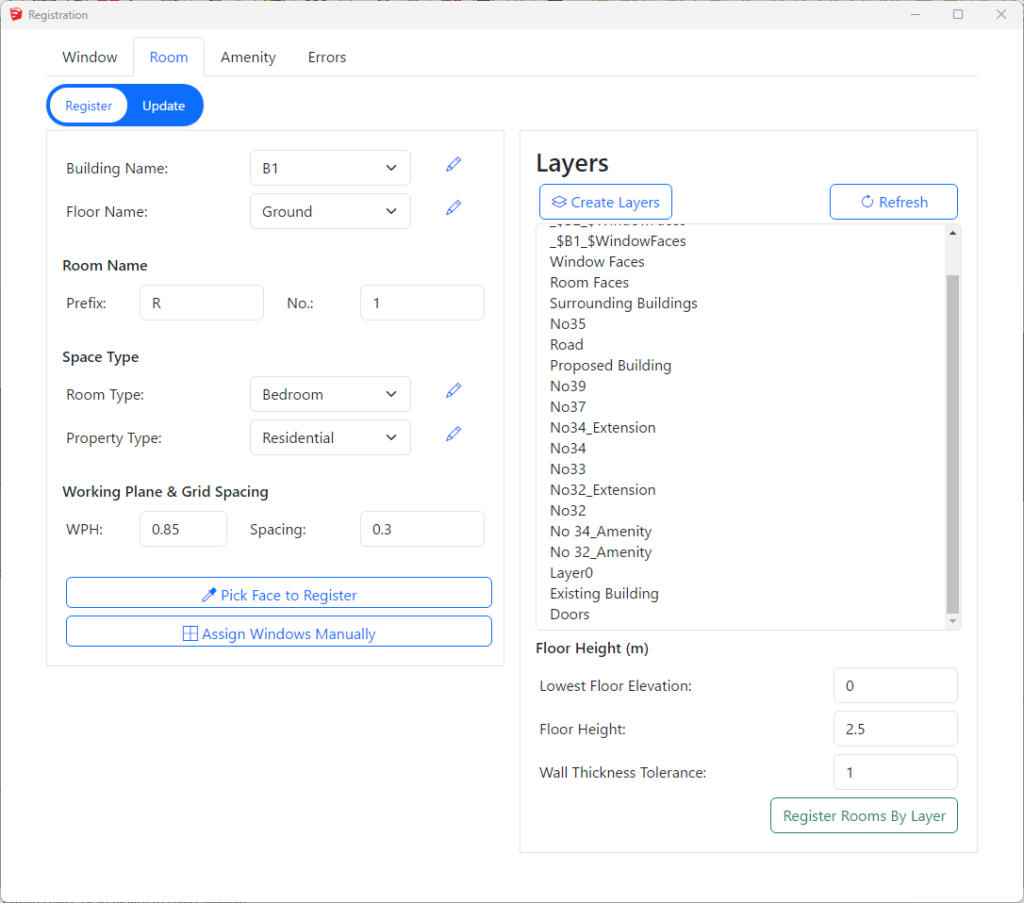
How to register multiple Room faces from Layers?
- Open Register Dialog then Click on Room tab then Click on the Register option.
- Select Building from the lists. The names can be edited by clicking on icon next to them.
- Floor name is detected automatically based on elevation of the room face.
- Lowest floor is assumed to be on 0 elevation. This can be adjusted on Lowest Floor Elevation text box.
- Default ceiling height is 2.5 m. This is used to decide which floors the faces belong to and can be changed if necessary.
- There must be enough entries for floor names on the list. Otherwise higher rooms will be placed on last floor.
- Select one or more layer (tag) names from the list.
- Press the Register Rooms By Layer button.
- Room number for faces will be automatically incremented by 1 from the given number.
- Room labels are added on to Room_Names layer. If they are not visible, make sure the layer is on.
How to specify name of the building on the layer name for layer registration for Room?
Layer name should start with _$ followed by name of the building followed by _$
- Room faces for the building B1 should be in a layer named _$B1_$RoomFaces.
- Room layers can also have room type and required adf at the end. So Bedrooms in B1 should be in layer named _$B1_$Bedroom_$1
- Open Registration dialog -> Room Tab -> Register Option has icon next to the room type dropdown list which opens the room types dialog.
- Select the room types from the table and Press Create Layers button to create the required layers for room faces for all the building names in the list for the selected room types.
- e.g. _$B1_$Bedroom_$1, _$B2_$Bedroom_$1
- If no room type is selected when pressing the Create Layers button, layers will be created without any room types.
- e.g. _$B1_$RoomFaces, _$B2_$RoomFaces
- Open Registration dialog -> Room Tab -> Register Option has
How to specify room type and required ADF value on the layer name for ADF calculation?
- Layer name should end with _$ followed by RoomType followed by _$ followed by Required ADF.
- The layer name can include room type info along with the building name.
- For example, Room faces for Bedrooms in B1 should be in layer named _$B1_$RoomFaces_$Bedroom_$1
- If building name is not included in the layer name, layer should be named RoomFaces_$Bedroom_$1
- To create the layers automatically Open Registration dialog – Room Tab – Register Option has icon next to Room Types dropdown option which opens the room types dialog.
- Select the room types from the table and Press Create Layers button to create the required layers for room faces for all the building names in the list for the selected room types.
- e.g. _$B1_$Bedroom_$1, _$B2_$Bedroom_$1
Amenity
How to register individual Amenity faces?
- Open Register Dialog then Click on Amenity tab then Click on the Register option.
- Select Building and Floor name from the lists. The names can be edited by clicking on icon next to them.
- Press the Pick Face to Register button.
- Hover the mouse over the face which needs to be registered. Click on the face when its highlighted.
- Amenity number will be automatically incremented by 1. Building, floor name or amenity number can changed if necessary before registering another face.
- The amenity label are added to Amenity _Names layer(tag). If they are not visible, turn on the layer.
- Press Esc to end the register process.
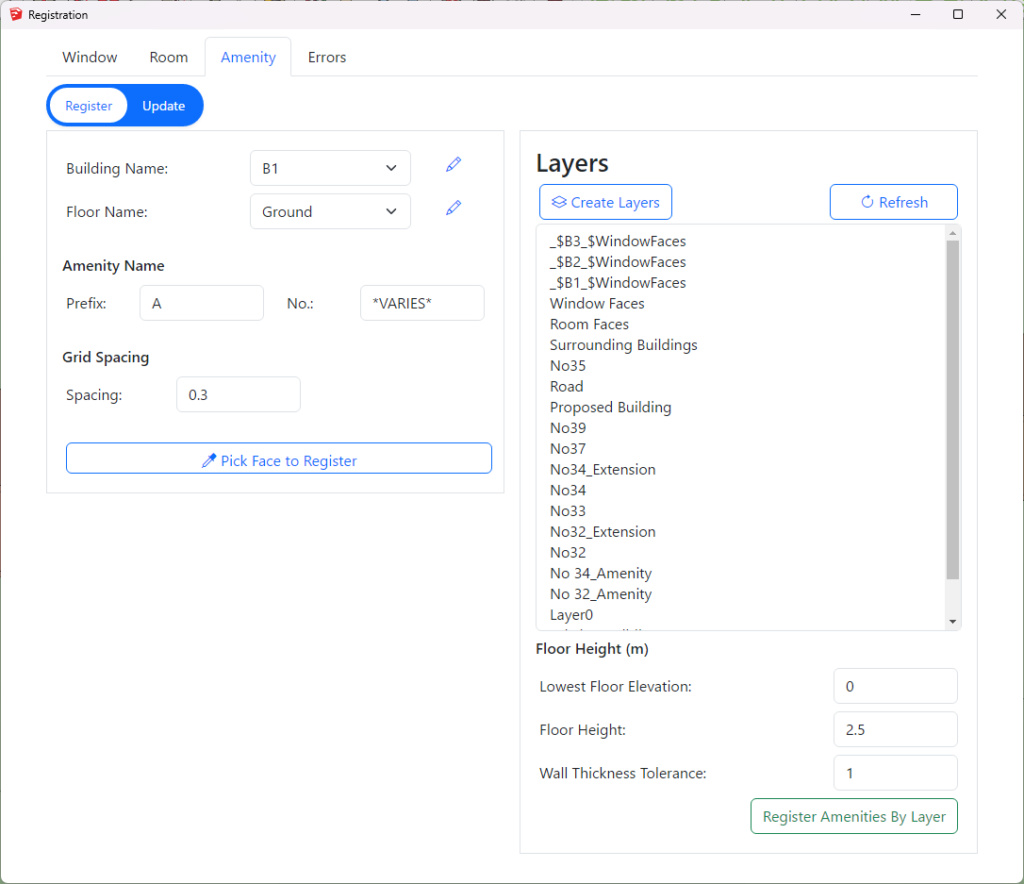
How to register multiple Amenity faces from Layers?
- Open Register Dialog then Click on Amenity tab then Click on the Register option.
- Select Building from the lists. The names can be edited by clicking on icon next to them.
- Floor name is detected automatically based on elevation of the amenity face.
- Lowest floor is assumed to be on 0 elevation. This can be adjusted on Lowest Floor Elevation text box.
- Default ceiling height is 2.5 m. This is used to decide which floors the faces belong to and can be changed if necessary.
- There must be enough entries for floor names on the list. Otherwise higher amenities will be placed on last floor.
- Select one or more layer (tag) names from the list.
- Press the Register Amenities By Layer button.
- Amenity number for faces will be automatically incremented by 1 from the given number.
- Amenity labels are added on to Amenity_Names layer. If they are not visible, make sure the layer is on.
How to specify name of the building on the layer name for layer registration for Amenity?
Layer name should start with _$ followed by name of the building followed by _$
- Amenity faces for the building B1 should be in a layer named _$B1_$AmenityFaces.
Modify
How to query registered Windows/Rooms/Amenities?
In Sketchup, there are few ways to query the registered entities. These options are available on update mode in registration dialog for each entity type (Register Dialog -> (Window/Room/Amenity) -> Update).
Query All
- Query All option is used to query all the registerd entities available.
- Open Register Dialog then Click on Window/Room/Amenity tab then Click on the Update option.
- Press the Query All button.
- All the registered entities will be listed on the table.
Query
- Query option can be used to fetch subset of registered entities based on the selected parameters in the form.
- Building Name, Floor Name, Entity Name prefix and entity number options can be used to filter the query.
- Select the appropriate value for above mentioned option as per your requirement. To ignore the certain option select either All or *VARIES*. Note: you can put *VARIES* in prefix text field to ignore the filter by prefix.
- Then click on the Query button.
Query Single Face
- Press the Pick Face to Query button.
- Click on the face. If the face is registered correctly, it will be added to the list.
Query Faces pre-selected in Sketchup
- Press the Query Selected Windows/Rooms/Amenities button.
- All registered entities will be added to the list.
- It can be face or the traffic light for windows.
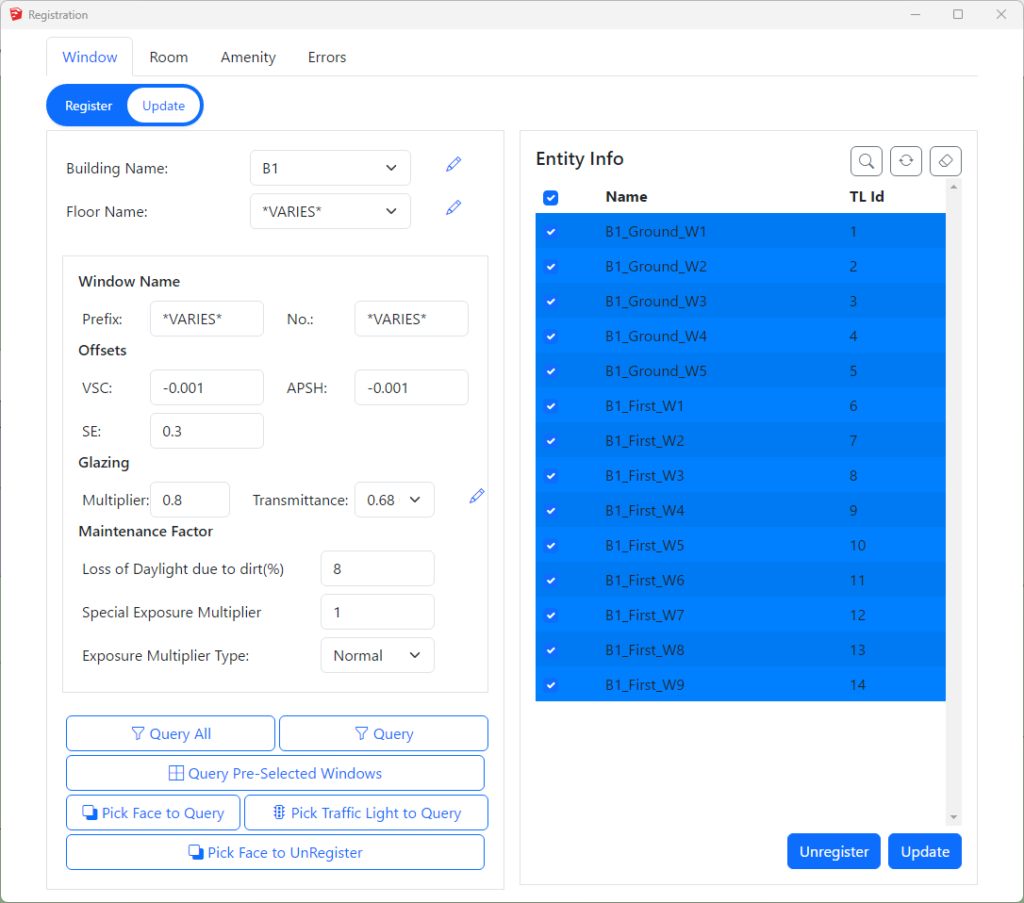
How to unregister registered Windows/Rooms/Amenities?
- UnRegister Everything
- Open Register Dialog then Click on Window/Room/Amenity tab.
- Then Click on the Update option.
- Press the Query All button.
- All the registered entities will be listed on the table.
- Select the entities (Windows/Rooms/Amenities) from the list you want to unregister.
- Click on Unregister button.
- UnRegister Single Face
- Press the Pick Face to UnRegister button.
- Click on the face. If the face is registered correctly, it will be unregistered.
- For windows, traffic lights cannot be clicked for unregistering.
- UnRegister listed entities
- To unregister the entities listed in table on right hand side of dialog box, you need to select the items.
- To select the single item simply click on it. If you want to select multiple items click on items with Ctrl key pressed or you can simply click on the box on the left side of the list.
- Similarly, to select the all items in the list, click on the box in heading section adjacent to Name.
- After selecting the items to be unregistered. Click on Unregister button.
How to renumber registered Windows/Rooms/Amenities?
- Renumber selected entities
- Open Register Dialog then Click on Window/Room/Amenity tab.
- Then Click on the Update option.
- Query the entities to be renumbered and select them.
- Add the number in No. option to be numbered from. For example, if you want to renumber B1_Ground_W3 and B1_Ground_W4 to B1_Ground_W5 and B1_Ground_W6 insert 5 in No. option.
- Click on
 icon which is located at top right of the table.
How to update building/floor names of registered Windows/Rooms/Amenities?
- Rename the building or floor name.
- The names can be edited by clicking on icon next to them.
- Edit the names and Save Names
- The window/room/amenity labels are automatically changed.
- The names can be edited by clicking on
- Update building name (Move registered entity to another building)
- Open Register Dialog then Click on Window/Room/Amenity tab then Click on the Update option.
- Query the entities to be updated.
- Select Building name from the list. The names can be edited by clicking on icon next to them.
- Change the Building name.
- Then click on Update button.
- Update floor name (Move registered entity to another floor)
- Open Register Dialog then Click on Window/Room/Amenity tab then Click on the Update option.
- Query the entities to be updated.
- Select Floor from the lists. The names can be edited by clicking on icon next to them.
- Change the Floor name.
- Then click on Updated button.
- The window/room/amenity labels are automatically changed.
Calculation
Façade Analysis
Façade Calculation
How to run facade analysis?
- Facade analysis is performed on group containing Sketchup faces.
- The facade faces must be facing out for vertical faces and up for horizontal faces.
- Select the group on the Outliner.
- Open the Calculation Dialog by clicking
 icon.
icon. - Go to Facade tab and then select the calculation.
- WPSH is run along with the APSH but the results come separately.
- Press the Run button.
- Once the analysis is complete, Select the Result group and Press Show Result.
- Press Clear All to hide all the facade results.

Transient Shadow Render
FAQs
The objects come very small in the rendered image.
Make sure the Menu bar > Camera is set to Perspective.
How can I reduce the noise in the image?
Increase the Pixel Samples to above 100 to get a sharper image.
The noise is inversely proportional to square root of this number: four times more samples are required to decrease the error by half.
How can I change the brightness of the image?
Open the Render dialogue and press the “ ” icon to open the settings.
Set the exposure to a lower value. If the values was already set to 1, try a fraction e.g. 0.6
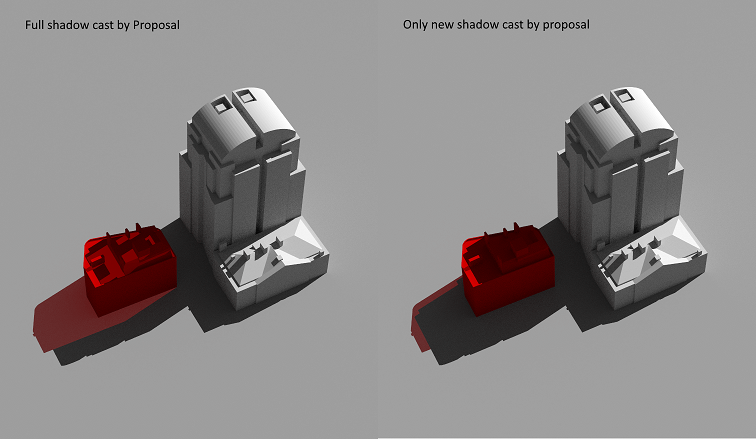
What is New Shadow Only option in render dialogue?
Tick New Shadow Only option to exclude part of the coloured shadow that already is rendered under the existing scenario.
Do I need to have a ground surface in the model for Transient Shadow analysis?
No. The software will insert a virtual ground just below the bounding box of the model.
You can remove the virtual ground by unticking the option on Render dialogue > “” > “Remove virtual ground”